Introduction
This blog is hosted on WordPress. I frequently configure WordPress sites on cloud servers. This article documents various configuration issues that I perform to solve common problems.
This article applies to Ubuntu 20.04/22.04 and WordPress 5.8 and newer. These tips might work on older setups but I do not test them.
Authentication and Authorization
When managing a server, usually you will work with four identities (logins):
- The identity that you logged into the server with.
- For example, azureuser on Azure, or ubuntu on AWS EC2.
- The identity that Apache uses to host sites.
- This is typically www-data.
- Superuser. This is typically root.
- The WordPress Administrator login.
- This identity is used to log into WordPress and manage the WordPress configuration, plugins, etc.
When managing Apache and its configuration files, you need superuser privileges. I switch identities to root using the command sudo bash instead of constantly running commands prefixed with sudo.
Warning: it is very easy to make mistakes while using the root identity. Sometimes these mistakes are fatal and you must restore from backup. Make sure you backup your system before making changes. Practice restoring from backups periodically. Document your backup and restore procedures.
When managing an Apache site’s files, they should be owned by the user and group www-data. A common mistake I often see is creating, extracting, and editing files as root and then forgetting to switch the ownership to www-data.
Use the following command to switch from your current identity to www-data. I store this command in a file named su_www.sh located in my home directory.
|
1 |
sudo -u www-data /bin/bash |
I can then easily switch identities:
|
1 |
. ./su-www.sh |
One security mistake that I see some make is to change permissions/rights for the user www-data:
- Do not enable a login with the identity www-data. This might make it easier for you to administer the sites but adds another target for hackers. You do not want the user www-admin to be able to run commands such as sudo to raise its privilege.
- Do not add www-data to other groups.
A best practice is to keep the user www-data as locked down as much as possible.
Quick Install
WordPress is very easy to install. I follow a few steps that get a site running very fast including SSL. In this example, I will create test.jhanley.com located on an existing server that hosts other domains.
WordPress Application Default Passwords Disabled
When testing on localhost, you must add the following to wp-config.php:
define( 'WP_ENVIRONMENT_TYPE', 'local' );
Problem: WordPress requires FTP to install plugins
This problem is often caused by incorrect file ownership of the site’s WordPress files. When you extract the WordPress files from a tar achieve, the resulting files are owned by the user nobody and the group nogroup. WordPress is running under the user www-data and the group www-data.
Solution
Go to the root of the Apache site. For example, /var/www/mysite.com. Execute ls -l and verify the file ownership. Change the file owner and group to www-data.
|
1 2 3 4 5 6 |
ls -l total 216 -rw-r--r-- 1 nobody nogroup 405 Feb 6 2020 index.php -rw-r--r-- 1 nobody nogroup 19915 Jan 1 2021 license.txt -rw-r--r-- 1 nobody nogroup 7346 Jul 6 12:23 readme.html [extra content removed] |
To change the file ownership, execute the following command either as root or with sudo:
|
1 |
chown -R www-data:www-data . |
The -R option means to perform the command recursively. All files in the current directory and all subdirectories will be affected. Consult the Linux man page for more information.
Problem: Cannot upload files larger than 2MB
Example for PHP 7.4 FPM
- Edit /etc/php/7.4/fpm/php.ini
- Change
upload_max_filesize = 2Mto the required size - Change
post_max_size = 8Mto the required size - Restart FPM –
systemctl restart php7.4-fpm
To determine which php.ini your server is using, create a PHP page:
|
1 2 |
<?php phpinfo(); |
Load that page into a browser. Review the following section:

Warning: Do not forget to delete or disable that page.
Wrong Administration Email Address
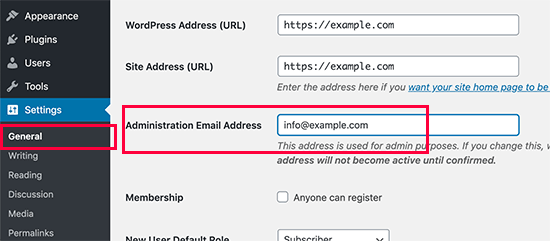
If you migrate a site from one domain name to another, WordPress might continue to use the old domain name for the Administration Email Address. To change the email address in WordPress Admin Panel, you must be able to receive an email at the old email address. How to change the email address without confirmation? I did not know how, so I researched this problem.

Where is the email address stored?
The email address is stored in the site’s database in the wp_options table.
This command displays the stored value of the administrative email address:
|
1 2 3 4 5 6 7 |
select * from wp_options where option_name = 'admin_email'; +-----------+-------------+------------------------------+----------+ | option_id | option_name | option_value | autoload | +-----------+-------------+------------------------------+----------+ | 6 | admin_email | info@example.com | yes | +-----------+-------------+------------------------------+----------+ 1 row in set (0.00 sec) |
Updating the WordPress database can be disastrous. Backup the database before making any changes.
This command modifies the stored value of the administrative email address:
|
1 2 3 |
UPDATE wordpress.wp_options SET option_value = 'username@example.com' WHERE option_name = 'admin_email'; Query OK, 0 rows affected (0.00 sec) Rows matched: 1 Changed: 0 Warnings: 0 |
Modify the command as follows:
- Change wordpress.wp_options to use the name of your WordPress database.
- Change username@example.com to your email address.
Problem: Sorry, you are not allowed to upload this file type.
Method 1:
WordPress includes an ALLOW_UNFILTERED_UPLOADS option in wp-config.php. Once enabled, you’ll be able to upload any file type to your WordPress Media Library.
Add the following line to wp-config.php
define( 'ALLOW_UNFILTERED_UPLOADS', true );
Note: That did not work. Logging out and back in did not solve the problem either.
Method 2:
Add the following code to a plugin or functions.php:
|
1 2 3 4 5 6 7 8 |
add_filter( 'upload_mimes', function($mimes) { // New allowed mime types. $mimes['svg'] = 'image/svg+xml'; $mimes['svgz'] = 'image/svg+xml'; return $mimes; }); |
That did not work either.
Method 3:
Use the plugin Enhanced Media Library.
That method worked. Now to figure out why the other two documented methods did not work.
Method 4:
Add the following code to my theme’s functions.php
|
1 2 3 4 5 6 7 8 9 10 |
function my_custom_mime_types( $mimes ) { // Add your additional allowed mime types here from the list above. $mimes['svg'] = 'image/svg+xml'; // Optionally, you can also remove MIME-types. // unset( $mimes['exe'] ); return $mimes; } add_filter( 'upload_mimes', 'my_custom_mime_types' ); |
This method did work.
Problem: One or More Recommended Modules are Missing
WordPress has a Site Health Status feature under Tools -> Site Health. I received the following warning:

This means that two PHP extensions should be installed:
- imagick
- intl
When installing PHP extensions, the first step is to know which PHP version the Apache server is using for your site. The easiest method is to use phpinfo() to display the version. Also, make note of which php.ini is being used for future reference. For my site:
- PHP version 7.4.33
- /etc/php/7.4/fpm/php.ini
Install the correct PHP extensions:
- apt install php7.4-imagick
- apt install php7.4-intl
Repeat the site health check and that warning should be gone.
Link to the team handbook in the image.
Article Tags
Summary
Hopefully some of these tips will help you build WordPress servers.
Photography Credits
I write free articles about technology. Recently, I learned about Pexels.com which provides free images. The image in this article is courtesy of Markus Winkler at Pexels.

I design software for enterprise-class systems and data centers. My background is 30+ years in storage (SCSI, FC, iSCSI, disk arrays, imaging) virtualization. 20+ years in identity, security, and forensics.
For the past 14+ years, I have been working in the cloud (AWS, Azure, Google, Alibaba, IBM, Oracle) designing hybrid and multi-cloud software solutions. I am an MVP/GDE with several.

Leave a Reply