
Introduction
I am currently writing an article January 2022 – Git and GitHub, which documents my 30-day journey to improve my GitHub skills. As part of this journey, I want to learn GitHub self-hosted runners. This article details how I got started and created my first runner.
I will be creating my runner using a Hyper-V virtual machine running Ubuntu Server 20.04. GitHub Runners have a large number of packages preinstalled. These are called GitHub Actions Virtual Environments [link]. GitHub publishes a README with details on the installed packages. This link is for Ubuntu 20.04.3 LTS. This link is for Microsoft Windows Server 2022 Datacenter. In total, GitHub provides seven virtual environments [link].
This article is turning into a series:
Note: For runners that support Docker workflows, you must use Linux for the self-hosted runner.
GitHub Documentation:
- Hosting your own runners – 10 sections
OS Package Requirements
I am not sure which packages need to be installed to create your own self-hosted runner. I could not find a GitHub document for this detail. This should not be too hard to figure out through trial and error.
Update 2021-01-03
The answer is no packages need to be installed. The GitHub self-hosted runner package works out of the box with a default Ubuntu Server 20.04 installation. I am not yet sure of the answer for Windows self-hosted runners.
Step 1 – Create Virtual Machine with Ubuntu
I do not know yet how large of a virtual machine is required. I will start with a small virtual machine and scale as required. I plan to duplicate my runner in Azure using Bs-Series virtual machines. Bs-Series are economical virtual machines that support CPU bursting. This might be a good match for small GitHub runners. A B2s has 2 cores and 4 GB of memory [link]. I will build something similar with Hyper-V.
- Create a Hyper-V virtual machine:
- Virtual Processors: 2.
- Memory: 4096 MB.
- 64-bit.
- Generation 2.
- Secure Boot disabled.
- Install Ubuntu Server 20.04.3 [download link]
- Configure with a static IP address.
- Update Ubuntu:
sudo apt update && sudo apt upgrade -y
- Install and set up OpenSSH.
sudo apt install openssh-server -y
- Shut down the virtual machine and create a checkpoint.
By checkpointing the virtual machine, I can start over with a base Ubuntu installation to repeat and validate my steps.
Update 2021-01-03
Once Ubuntu is installed and running, I recommend creating a username for the GitHub runner application. In part 2 of this series, I cover advanced features that I learned through trial and error and that are not part of any documentation that I can find.
Step 2 – Create GitHub Runner
I will download and install the GitHub Runner package before adding any other packages. My goal is to see what is required and document those requirements.
GitHub Steps:
- Create a new repository in GitHub.
- Go to Settings -> Actions -> Runners.
- Click New self-hosted runner.
- Copy the download and configure scripts. See below for my examples.
Virtual Machine Steps:
Download:
The documentation does not specify where to install the runner. I do plan to make this a service, so basing installations on a user account is usually not a good idea.
Note: I am using the username jhanley in the scripts below. In part 2 of this series, I discuss better username strategies.
My pre-steps before the GitHub download step:
|
1 2 3 4 |
# Create a root folder sudo mkdir /github sudo chown -R jhanley:jhanley /github cd /github |
GitHub download steps:
|
1 2 3 4 5 6 7 8 |
# Create a folder $ mkdir actions-runner && cd actions-runner # Download the latest runner package $ curl -o actions-runner-linux-x64-2.285.1.tar.gz -L https://github.com/actions/runner/releases/download/v2.285.1/actions-runner-linux-x64-2.285.1.tar.gz # Optional: Validate the hash $ echo "5fd98e1009ed13783d17cc73f13ea9a55f21b45ced915ed610d00668b165d3b2 actions-runner-linux-x64-2.285.1.tar.gz" | shasum -a 256 -c # Extract the installer $ tar xzf ./actions-runner-linux-x64-2.285.1.tar.gz |
Configure:
I accepted the defaults for each question that the script asked me.
|
1 2 3 4 |
# Create the runner and start the configuration experience $ ./config.sh --url https://github.com/hanley-dev/self-hosted-runner-ubuntu --token REDACTED TOKEN # Last step, run it! $ ./run.sh |
That appears to have worked.
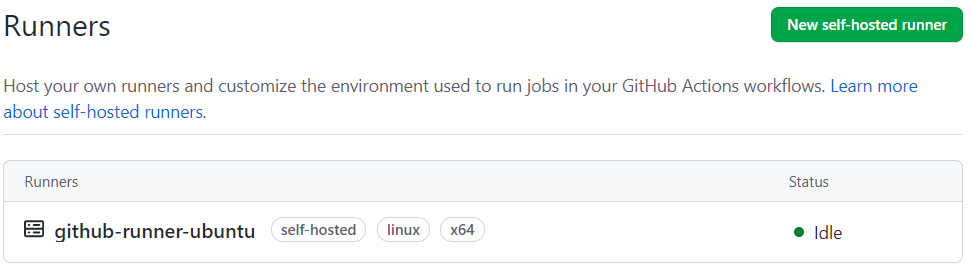
This screenshot shows what GitHub displays at Settings -> Actions -> Runners.
Notes:
- The configure script uses a token. That token is provided in the GitHub GUI. I don’t know anything about that token, or what the token represents (runner identity, expiration, etc.), or how to create that token.
Step 3 – GitHub Hello World Action
As a first test, I will create a GitHub Workflow that uses my self-hosted runner and simply echos Hello World.
Create a new GitHub Workflow and paste the following code:
|
1 2 3 4 5 6 7 8 9 |
name: Hello-World on: [push, workflow_dispatch] jobs: build: # The type of runner that the job will run on runs-on: self-hosted steps: - name: Say Hello World run: echo Hello, world! |
I added workflow_dispatch so that I can test without doing a push.
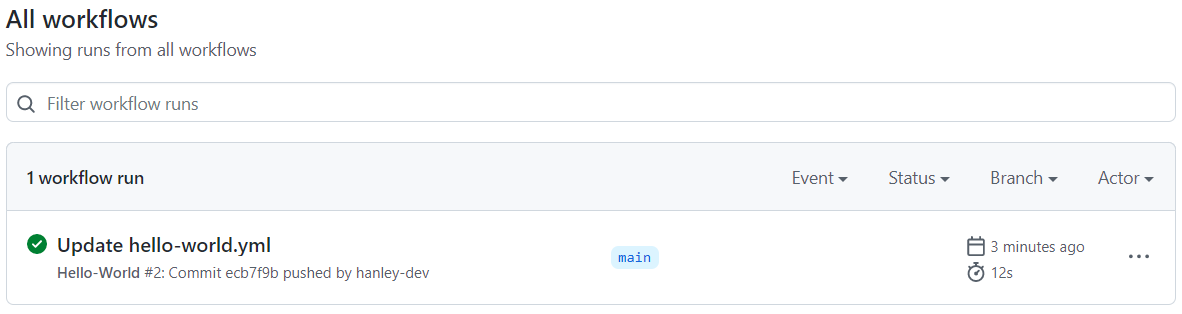
That worked. Here is the output from my virtual machine:
|
1 2 3 4 5 6 7 8 |
$ ./run.sh √ Connected to GitHub Current runner version: '2.285.1' 2022-01-02 23:19:22Z: Listening for Jobs 2022-01-02 23:31:37Z: Running job: build 2022-01-02 23:31:43Z: Job build completed with result: Succeeded |
This is a screenshot in GitHub under Actions show job success:
More Information
GitHub Documentation:
- Hosting your own runners – 10 sections
Summary
That was too easy. I am impressed. As I said in my GitHub article, GitHub Self-Hosted Runners are pure genius. Yesterday, I read the documentation. Today I created my first runner. Total time including writing this article was 90 minutes.
When I think about all the things that can be done with self-hosted runners and private compute resources, I get excited. Now it is simple to use GitHub with private repositories with actions that deploy behind corporate firewalls or in cloud private networks.
The beauty of GitHub’s design is the runner connects to GitHub. That means the self-hosted runner can itself be a private instance without all the mess of configuring firewalls, Bastions, VPNs, etc.
I will continue learning more about GitHub Self-Hosted Runners. This includes an Azure virtual machine, setting up environments for .NET, PHP, and Python, Docker, and more. I am very interested in GitHub actions that use a self-hosted runner that then use SSH to connect to other systems on-premises or in private cloud networks.
Continue and read the second part:
Photography Credit
I write free articles about technology. Recently, I learned about Pexels.com which provides free images. The image in this article is courtesy of Vishva Patel at Pexels.

I design software for enterprise-class systems and data centers. My background is 30+ years in storage (SCSI, FC, iSCSI, disk arrays, imaging) virtualization. 20+ years in identity, security, and forensics.
For the past 14+ years, I have been working in the cloud (AWS, Azure, Google, Alibaba, IBM, Oracle) designing hybrid and multi-cloud software solutions. I am an MVP/GDE with several.
2 Pingbacks